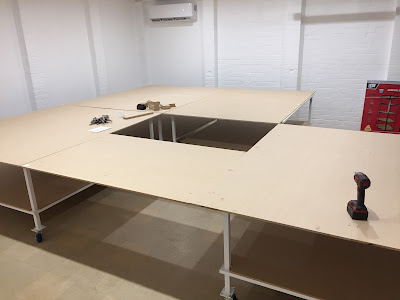
It was time to transport the 5 tables to their long term home... my home. With some help from my friends, we lifted and loaded them one at a time onto two available work trucks. Only one would fit on each truck so we made 3 trips total. Being careful to avoid any rain because MDF boards will swell up with any moisture. At one stage on the way we had to seek shelter at a Bunnings Hardware store to avoid a short yet annoying rain session. They have a drive in hardware area for picking up wood etc. We made the most of it by enjoying a sausage sizzle lunch (a staple of Bunnings stores) and purchasing all the shelving units I needed for the room.
 |
| A little painters tarp for protection in case of light rain only. Lasted about 2 mins on the road... |
The swivel wheels made pushing the tables into the garage a breeze. They were much smoother than I had anticipated. A few laps around the table with a tape measure to ensure it was square with the walls and it was all done!
 |
| Positioning all the tables in the correct order. Shelving boxes ready to be unpacked. |
 |
| Only missing the last table in this shot. Waiting for the rain to pass. |
 |
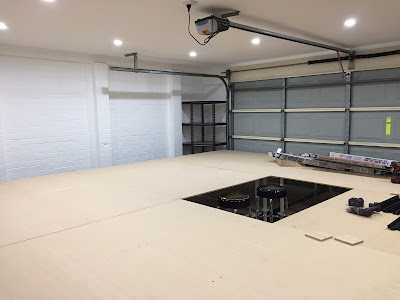
| Underneath where each table joins I clamped and screwed some smaller panels to help level out the lips of each board. Especially where 3 boards meet in the middle space. |
In the end I was so happy with the completed table being home and safe that I totally forgot to take a photo of it without anything placed on it. Doh...
After the shelves are installed there will be between 70cm and 90cm space to walk around the table on 3 sides. Plenty. The final side is against the roller door which is motorized so I can access it easily if needed just by raising it.
My plan for the shelving was to have one entire wall dedicated to UCS Star Wars models. Between the 2 Doors I could fit two 1500mm wide shelving units but seeing as I was never going to use the rear door I decided to place an extra 1200mm wide shelving unit. That rear door has a steel frame so we added a cross beam on the inside and on the outside we added a wooden frame and used silicone to weather proof and seal it shut. The space was perfect for the 3 shelving units, like it was meant to be.
A few days after Christmas when my family was over for a feed my Dad and Brothers were kind enough to help me assemble them all. Even putting up with my constant stopping them to measure out where I wanted the shelf heights to be.
The large shelving units are reserved mainly for my Star Wars Ultimate Collectors Series models but on the lower shelves I might put some battle scenes like Battle of Endor and Ewok Village or Assault on Hoth. We'll see how it plays out later.
 |
| 2 side by side shelving units 1500 (wide) x 2000 (high) x 550mm (deep). 1 smaller 900 (wide) x 1800 (high) x 400mm (deep) fits alone in the far left corner. |
 |
| 1200 (wide) x 2000 (high) x 550mm (deep) shelf blocking the back door and completing the 4.2 Meter wide mega shelf. Large upper shelf space is for the UCS Death Star II. |
Luckily I also found a corner unit in the same style as the rest that fits like a glove in the far corner. I think I'll use this for Ninjago/Nexo Knight.
Later in the two brick wall spaces next to the corner unit I'll be installing some modular style hanging shelves, allowing me to have approximately 10 shelves each. I plan to display Bionicles, Buildable Figures, Brickheadz and other smaller style builds on these once installed.
 |
| 700 x 700 x 1800mm (high) corner unit fits into that space like a glove! |
Even though as we were building them I measured and set where I wanted shelves, when it actually came time to add sets I then I spent at least two hours changing around almost all the shelf heights to better accommodate the viewing of models and appease my OCD.
 |
| View of the entire shelf wall. Chewie arrives for a surprise inspection! |
 |
| 2 hours later with many minor adjustments. I placed some UCS models to help get the shelf heights correct. |
I forgot to mention, early on in the garage prepping phase, my Father In Law sneaked in and installed some great looking LED downlights to replace the old fluoros. Fantastic surprise. Since the room is mainly white the light bounces around brilliantly. He also ran extra power to various spots in the room along with Ethernet and coaxial for TV. Thanks Pete.
 |
| 10 LED downlights in a square pattern which pretty much follows the square table. |
Pete also installed the modular shelving verticals for me. I spent a good 40 minutes working out how I wanted to space the shelves and therefore how many shelf clips I was going to need. I haven't made a decision on what material to use as the actual shelf, I have some left over MDF from the tables I could use but I may need to paint them depending how it looks.
| Extra modular shelves are still a work in progress. |
Remember that bottom level of the tables that was a bit dark, I mentioned it may need some lighting under there to do justice for model viewing. Off to Bunnings again and after reading every single different package I found some supposedly easy to install LED strips of various lengths with adhesive backing.
 |
| I ended up using 5x 5 Meter lengths and 2x 10 Meter lengths. |
After many hours on my back between the table tops it was done and I was extremely happy with the LED strips... until I walked in the next day and found most of them were dangling off the table frame. Even though I cleaned and wiped the surface, the adhesive had managed to let go during the night.
My Plan B was to use even stronger double sided tape, so I went around and applied it to most of the backing. This stuff was almost impossible to peal off the table when I made a mistake. I was very happy with the solution... until the next day when AGAIN some of the had drooped off the able frame.
After a couple days thinking on and off about it and dismissing ideas such as cable ties (no space between frame and wood), ribbons (waaaaay to tedious), I decided to use an extra wide super strong weather resistant extra adhesive mega awesome clear sellotape and would wrap it around both the LED strips and the table frames lengthwise. It was like laminating the table and the frames together and with the sellotape holding from three different directions I was pretty sure it would hold this time... until a few days later when I was CERTAIN it was a success because everything was holding strong with no sign of movement. Phew.
Ultimately you're probably meant to supplement the adhesive with some staples or screws or something else to secure them more firmly.
 |
| After installing 4 straight 5 Meter lengths. I like it. You can see the as yet unlit tables in the background for comparison. |
The TV installation for me was going to be interesting. If I had done the wall mounting and wires myself it would have been a mess. Thankfully Pete has a lot of experience wall mounting TV's and he routed all the necessary cables through and from the roof and hid them inside some white channel which will be the only thing exposed. I have some ideas on how to make that channel into a bit of a feature or I can leave it white and let it blend in as best it can.
Having the TV mounted between 2 brick columns will greatly help the "don't bump into it factor" It barely comes out past the columns and I still have room to access the back of the TV from all sides.
 |
| Running Power, Ethernet, Coaxial and 2x HDMI cables all hidden behind the TV with the mounting plate. |
 |
| The LEGO Batman Movie breaks in the TV. Looks clean. Those boxes are gonna have to move soon to keep the view clear. |
Super happy with how everything has finished so far!
It's time to move in all the LEGO and this garage has finally become a LEGO Room.
Part 3 will be a full tour of the completed LEGO Room including my first video. I'll also detail a little more about the entertainment and "productivity" system.


